


So you’ve finished an interview recording.
Whether you’re using that conversation in an article or a research project or editing it into a video or podcast, it’s time to transcribe it.
Where do you start? You start by typing “how to transcribe an interview” into Google, but you probably already did, and that’s what brought you here. Hi!
You’re in the right place, because Descript will automatically transcribe your interview (and let you edit the audio or video right from the transcript). But if you want to learn more about different transcription options, here’s what you need to know.
What is an interview transcript?
An interview transcript is an audio track converted into text so people can read it. Before you start transcribing, it’s worth considering the transcript’s ultimate purpose.
- Are you using the interview as a research source? If you just want to drain your subject’s brain with interview questions, and their exact quotes don’t matter, you don’t have to waste your time with an intelligent verbatim transcription. A quick and dirty job will do.
- Will you be quoting your subject for publication? People don’t typically like being misquoted. Yet, it rarely reads well when people are quoted exactly as they speak in real life. You’ll likely want to split the difference: Go through that audio with a fine-tooth comb, get it down as faithfully as you can, and eliminate all the “ums,” “ahs,” and unnecessary “I means.” No one will fault you for making them sound more articulate.
- Is every single word, pause, and false start important? You’ll have to do a full verbatim transcript. When details count, they really count, so having every detail from your interview will be helpful for your project.
How to transcribe an interview the easy way
1. Choose transcription software
Praise the robots, for they allow us to save time.
Not only is a lot of transcription software free (or free to a point), but it also takes the drudgery out of the transcription process. Some errors and typos are inevitable, so you’ll want to edit the text afterward, even if you use a high-quality transcriber like Descript.
Descript automatically transcribes any file you import; just drag your audio into the app, wait a few seconds, and you’ll have a complete transcript.
That, in our very biased opinion, makes Descript the best transcription service, hands down. Still, if you’re not using Descript, rest assured there are plenty of automated transcription apps out there. Many offer free trials or a limited number of free minutes, but results vary in accuracy, speaker identification, and pricing tiers. Whichever tool you pick, remember you’ll probably still have to edit the transcript for accuracy.
2. Upload your audio or video file
Open your Descript app, then click New project in the upper right corner.

On the following screen, name your project and click Choose a file to transcribe.
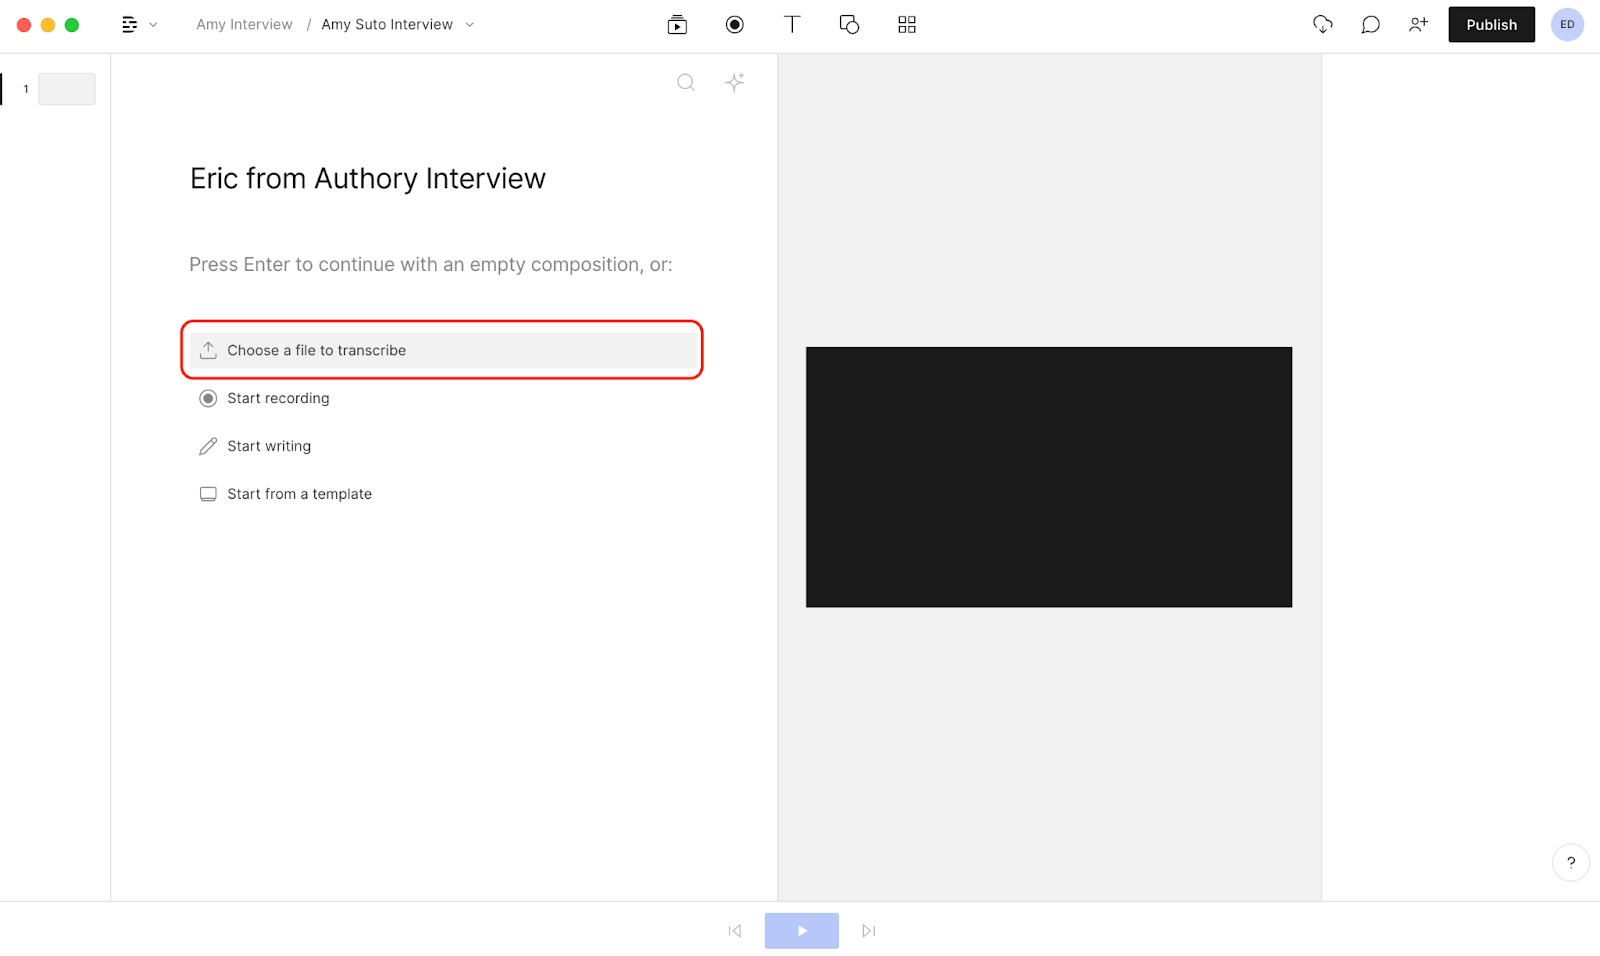
Choose your file.

After selecting open, Descript will automatically transcribe your audio or video file.
3. Label speakers
Next, Descript will ask you to identify the speakers in your file. If it’s just you and another interviewee, select two from the dropdown menu.

Descript will then ask you to identify each speaker. We'll play you a short clip from your file, and you'll type in the speaker's name.
Then click Add “Name” as speaker. Easy peasy!

4. Edit your transcript as needed
Now you’ve got a transcript ready for editing.

You probably see some mistakes already. With Descript, you can edit your audio by editing the text in the transcript.
If you don’t like a word or sentence in your transcript, highlight it and press delete on your keyboard. You can also correct words and punctuation quickly with a few handy keyboard shortcuts.

You can also choose to automatically correct any mistakes the AI made. Access them in the upper right hand corner of your transcript.

You’ll find shortcuts like:
- Shorten word gaps. Remove long periods of silence from your recording automatically. Set how many seconds (or more) of gaps to fill, then reduce them to whatever you want.
- Remove filler words. Descript will automatically remove filler words like "you know," "well," or “um”. It can also remove stutters and repetitions.
- Detect transcription errors. Clean up your transcript quickly with this tool. Click this button and Descript will highlight probable recording errors for your review.
5. Export and proofread the transcript
At this point, you’ve got a clean transcript ready to go. The last step here is to export the transcript and give it a good proofread.
First, click the Publish button in the top right corner of your screen. Click the Export tab and then the Transcript button.

Before exporting the file, you can choose to include:
- Composition name
- Markers
- Ignored text
- Speaker labels
You can also choose how often you want the timestamps to appear in your transcript file, and the format of the transcript file. Once you hit Export, you can find the file on your computer.
Here’s an example of what we just made.

💡PRO TIP: If you’re publishing the transcript as-is, hire an editor or use Grammarly to tighten it up. There will likely be grammar errors you missed during editing. It’s normal. Edit the transcript before pushing it live to truly make it shine out in the wild.
Other methods to transcribe an interview
The above process for transcribing interviews is super easy, but if you’re up for a bit more of a challenge, or have more budget, there are two other types of transcription methods.
Transcribe interviews manually
Transcribing interviews manually is the “roll up your sleeves and type like the wind” approach. There aren’t many fancy tools here, just you, your audio recording, some headphones, and a word processor. (There are tools that will let you slow down and go back in a recording without leaving the keyboard, though — our managing editor has trusted the manual transcription tool from Wreally for years.)
The upsides are that it’s free (assuming you have the basic interview recording equipment), and you’ll get very familiar with the material. The downsides are that it is time-consuming, and if you don’t have fast typing speed, it could feel like a Sisyphean task.
Here’s a rundown of how to get started.
- Gather your materials. You’ll want a pair of headphones, a decent word processor, and a keyboard.
- Listen to the entire interview first. If possible, you should listen to the interview soon after you do it so it’s fresh in your mind. If you or your subject dropped a word or mumbled, you might remember what was said within a day or two. But if it’s been a week or more since the interview, you probably won’t.
- Do a rough pass. Perfectionists might struggle with this step, but listen to the audio track and do your best to type everything out without stopping. This will give you an editing basis. It will probably look like a drunk person’s manifesto when you’re done, but that’s fine.
- Edit your rough pass. Before you listen through again, fix up your messy transcript the best you can. Separate the speakers from one another and correct any words or phrases you can.
- Listen again and adjust your transcript. Now that you have a serviceable document, follow along with your transcript as you listen again, tweaking words or phrases as necessary. If you’re lucky and your subject spoke slowly, this may be the only extra step you need.
- Listen through and adjust again as needed. As mentioned earlier, if you only need the transcript for the information you got from the subject, you likely don’t need to worry about getting everything exactly right. If you do need precise quotes, listen to your recording and edit your transcript until the two match up.
Hire a transcription service
Nothing beats that human touch, at least for now. Some people prefer to send their audio files to professional transcriptionists for maximum accuracy. People can handle the nuances of human speech more reliably than software alone can. If you love Descript but need a precise human transcript, White Glove is an option right in the app. Provided your audio quality is decent, you’ll get up to 99% accurate transcripts.
Example of an interview transcript
Here’s an example of an edited transcription with timestamp headers:
Interviewer (Content Marketer, Susan): Good afternoon, Mike. Thank you for taking the time to be with us today.
Mike (Founder, MarketingTool.io): Hi Susan, thank you for having me.
[00:00:15]
Susan: Mike, can you briefly tell us what inspired you to create MarketingTool.io?
Mike: Absolutely. I saw a gap in the market for user-friendly and cost-effective marketing tools. I wanted to create something that every business could use.
[00:00:35]
Susan: Interesting. What's the core functionality that sets MarketingTool.io apart from other tools?
Mike: Our AI-driven analytics. It not only provides accurate data but also insightful suggestions on how to improve your marketing strategies.
[00:01:00]
Susan: That sounds like a game-changer. Can you tell us about a significant challenge you faced while developing this tool?
Mike: Building the AI was the toughest part. It had to be smart yet straightforward. The balance was challenging but we managed it.
[00:01:30]
Susan: I can imagine that was a significant task. Moving forward, what new features can your users expect from MarketingTool.io?
Mike: We're planning to integrate more social media platforms and add real-time tracking capabilities.
Final thoughts
The nice (and maddening) thing about transcribing is that you know you can always get a free transcription by just doing it yourself.
But if you have the option of hiring a transcriptionist to do it, it’s definitely something to consider. Transcribing an interview podcast is fun once or twice, but if you have a whole bunch of long, say, qualitative research interviews to get into text, you’ll be kicking yourself and/or going insane before long.
Interview transcription FAQ
What is the easiest way to transcribe an interview?
The easiest way to transcribe an interview is by using an automated transcription service like Descript. These apps use AI to convert spoken words into text, reducing the manual effort and time required to transcribe an interview.
How would you transcribe an interview?
To transcribe an interview, you would simply upload the audio or video file to a software like Descript. It’ll generate a written transcript in minutes and you can edit for accuracy.
How long does it take to transcribe a 60-minute interview?
If you’re using an audio-to-text app, the turnaround time to transcribe a 60 minute interview is minutes. You’ll need to spend some time reviewing and correcting errors. If you’re transcribing the interview manually, it could take you up to six hours considering you have to pause, rewind, and review way more often.
How can I transcribe an interview for free?
You can manually transcribe your audio using a text editor—this costs no money but does take time. If you prefer an automated approach, Descript offers a free plan that includes some transcription minutes each month. For short files, the free plan is often enough.
How much does it cost to transcribe an interview with Descript?
Descript has a free plan that covers a limited amount of automatic transcription. If you need to work on longer recordings or want additional features, you can upgrade to a paid subscription. You won’t pay extra per interview—your plan covers however many audio or video hours you have available each month.


