


Enhancing video quality means improving the sharpness, color, stability, and audio of footage you already have, both in-camera and in the edit. The biggest gains usually come from better lighting and clean audio, since viewers forgive soft video long before bad sound. Descript lets you clean audio, add captions, and tighten footage to lift overall quality.
In movies, visual style and spectacle can captivate the audience as much as the story and characters. Online audiences are no different. And you — the creator of the videos they watch — need to keep up with those expectations by maintaining great video quality — at the very least.
Consider the fact that one report found that 36% of consumers feel production value is “somewhat important,” while 28% feel it’s “essential.” Enhancing the visual quality of your online videos is table stakes these days.
You don’t need to be a Nolan or a Spielberg to know how to visually elevate your videos. In fact, you can apply easy and accessible best practices, no matter what your budget is. In this article, we’ll show you what you can do to improve your videos using expert tips and the best video enhancer tools available on the market today.
Table of contents:
- How to enhance video quality with Descript
- Top tools for enhancing video quality
- Tips for enhancing video quality
- Video editing enhancement FAQ
How to enhance video quality with Descript
Descript is a powerful video editing tool that can simplify the way you create your videos. Below, we’ll walk you through how you can use it to add visual flare and quality to your videos. But first, get yourself signed up so you can follow along and play around with the easy-to-use features on the platform.
Step 1: import your video
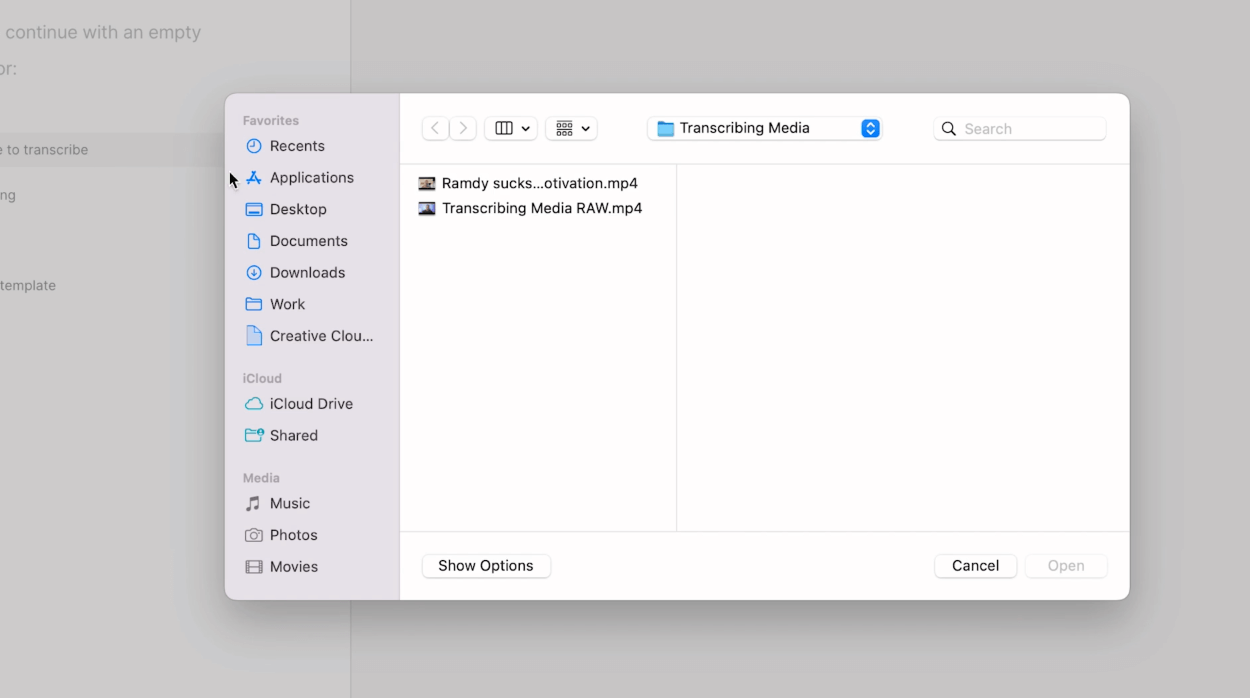
You can seamlessly import your video files to Descript whether you’re working with raw footage or existing video files. Descript supports a wide range of video formats — MP4, MPEG, MOV, and Apple ProRes, specifically — making it easy to bring your content into the platform.
Step 2: transcribe and edit your text
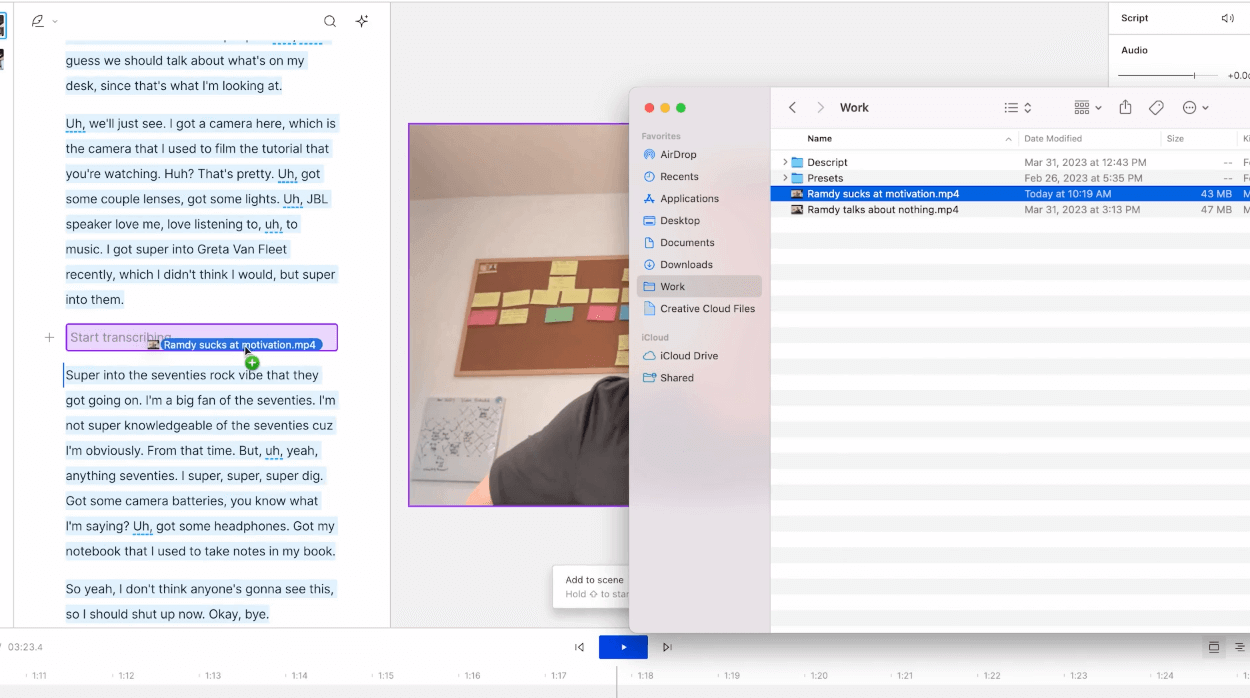
Descript’s widely loved transcription feature automatically transcribes your video audio into editable text. This transcription becomes the foundation for precise video editing. You can easily make text-based edits, such as removing filler words, correcting mistakes, or rearranging sentences, and the edits will translate into your footage.
Step 3: edit and adjust the video clips

Descript goes beyond audio editing, giving you a full suite of visual editing tools to enhance the quality of your videos. You can:
- Trim and cut video segments
- Apply transitions between scenes
- Add captions or subtitles to improve accessibility
- Use advanced color correction and grading features to adjust the brightness, contrast, and color balance of your footage
Step 4: export and share
Once you’ve perfected everything using Descript’s editing tools, it’s time to export and share your video. While Descript only exports videos to MP4, there are numerous ways to customize your audio and video settings in the export menu. You can adjust the audio bitrate, normalize volume, or increase the dimensions of your video from 720p to 4K.
Descript also offers other output options, like publishing as a standalone page, audio, GIF, text, or subtitle file. You can also export your Timeline to continue editing in most major audio and video editing tools, or publish directly to any of its integrated publishing and distribution platforms (including YouTube).
Top tools for enhancing video quality
There are plenty of video enhancer tools to choose from — all varying in complexity, price, and best use case. Below, we’ll show you five recommended options for improving video quality. For instance, Canva provides a free online video enhancer that simplifies quick touch-ups like adjusting brightness and contrast or refining low-light footage.
1. Descript

Descript has everything you need for enhancing the quality of your videos. We covered some of the features above, but here are a few more reasons to use our tool to bring your videos to the next level.
Pros and cons of using Descript
Descript’s AI-powered interface makes enhancing video quality an intuitive process. Here are a few pros of using Descript:
- Accessible and user-friendly interface. Descript’s interface is designed with your experience in mind, making it accessible and easy to navigate for both beginners and experienced users. Its intuitive design allows for a seamless editing workflow.
- Integrated video and audio editing: Descript offers a seamless integration of video editor and audio editor within a single platform. This integration lets you make synchronized edits to both the visual and audio components of your videos.
- Intelligent video editing capabilities: Overdub allows you to generate synthetic voices based on your own recorded voice, which can be useful for voice overs or fixing narration. Its face detection and tracking technology also enables you to make precise edits based on facial expressions or gestures in the video.
Still, there may be some downsides depending on your expertise level and needs. Here are a few cons of using Descript:
- Limited advanced video editing features compared to professional-grade video editing software. While Descript offers essential video editing functionalities, it may not have the same extensive range of features as dedicated video editing software.
- Requires an internet connection for full functionality. Descript operates as a cloud-based platform, which means that an internet connection is necessary to access and use its features.
Descript pricing plans
For more details on what each plan includes, see the pricing page.
2. A professional-grade editing software
Another professional-grade editor is commonly used by producers and content creators of all levels. It offers advanced import options, intuitive organization, and a suite of editing tools for refining footage, including robust color enhancement and broad format support. Such editors often come with in-depth controls for brightness, contrast, and color grading. Consistent updates and robust marketplaces for plugins can extend functionality even further.
Pros and cons of using a pro-level editor
Pro-level editors can excel at video enhancement, especially if you need professional-level capabilities. Below are some advantages of choosing this type of editor:
- Powerful color correction and grading. Many pro editors support advanced color and brightness adjustments, helping you achieve cinematic results.
- High-resolution support. These tools handle 4K or higher footage, preserving details and letting you push creative boundaries.
That said, there are a few drawbacks to consider when comparing pro-level editors:
- Learning curve. Mastering a pro-level interface can be complex for beginners.
- Resource-intensive. Editing in high resolutions often requires powerful hardware to ensure smooth operation.
- Recurring cost. Some professional editors charge monthly or yearly fees, which can add up over time.
Typical pricing considerations
Many pro-level editors require monthly or yearly subscriptions, or large one-time purchases. For details on current pricing, consult the official vendor documentation of whichever pro editor you're considering.
3. An advanced macOS-based editing platform
This option offers professional-level editing and color correction tools, frequently used in film and commercial projects. It integrates smoothly with macOS hardware and software, offers extensive color grading and HDR support, and comes with a large library of video effects.
Pros and cons of using a macOS-based platform
Below are a few advantages of using a macOS-based editing platform:
- Sophisticated color-grading tools. They can produce cinematic visuals and help you achieve precise color control.
- HDR support. Allows for deeper contrast and vivid highlights.
- Comprehensive effects library. Includes filters, transitions, and more to enrich your final video.
Despite these advantages, there are a few limitations to using a macOS-based platform:
- macOS exclusive. This platform isn't available on other operating systems.
- Steep learning curve. Particularly for those switching from a different editing ecosystem.
- Upfront purchase cost. This may be higher than some subscription-based options.
Typical licensing approach
Because this editor is macOS-exclusive, there’s usually a one-time purchase cost. Similar to other pro editors, updates may or may not require additional fees depending on the vendor’s policy.
4. Advanced color correction and compositing software
This editor is often chosen for its professional-grade color correction, compositing, and audio post-production capabilities. It includes a robust suite of built-in effects, motion graphics, and mixing tools for film-quality results.
Pros and cons of an advanced color correction workflow
Below are a few notable benefits of using a color-focused editor for professional-grade projects:
- Integrated visual effects. Lets you combine, edit, and enhance footage in a unified workflow, eliminating the need for separate software.
- Comprehensive audio tools. Offers audio post-production features enabling you to mix and master sound at a professional level.
Like any specialized pro editor, these color-centric solutions also come with a few drawbacks:
- Significant learning curve. Advanced color grading features can be overwhelming for newcomers.
- Higher hardware demands. You may need a powerful GPU and plenty of RAM for smooth performance.
- Complex workflows. May slow you down if you only need basic improvements.
Licensing approach
Like other professional editors, the licensing for these specialized color tools may involve both free and paid versions with varying feature sets. Always review the official site to see which plan fits your post-production needs.
Tips for enhancing video quality
We’ve worked with thousands of experienced video creators and picked up tips that help transform footage from unimpressive to eye-catching. These tips are quick, budget-friendly, and relatively easy to implement—no fancy Hollywood budget required.
Here are a few easy, cheap, and (relatively) time-efficient tips and best practices you can use to improve the quality of your next video project.
1. Fine-tune brightness and contrast
Brightness and contrast in video refer to the control of light intensity and the distinction between the darkest and brightest areas of your footage. When the brightness and contrast of your settings are off, your viewers may miss important details or experience a loss of immersion.
Below, we’ll walk you through some tips and best practices for adjusting brightness and contrast effectively.
- Experiment with exposure to strike the right balance. Overexposure can result in loss of highlights, making bright areas appear washed out and lacking in detail. Conversely, underexposure can lead to shadows with little visibility, making the video look murky. Play around with these settings to get a feel for what “balance” is.
- Think about contrast as a way to add depth. Properly adjusting contrast can add depth and richness to your video. A well-balanced contrast setting allows for clear distinctions between light and dark areas, making your content more dynamic and engaging. High contrast can make colors pop and add visual impact, while low contrast can create a softer and more subtle mood.
- Check your video on different screens and devices. Brightness and contrast settings can appear differently based on the device and environment your video is playing in. When editing, consider the target platform, such as mobile devices, computer screens, or television, and ensure the brightness and contrast are adjusted to suit where the video will play.
With Descript, you can use the real-time preview feature that allows you to see the impact of brightness and contrast adjustments instantly, enabling you to fine-tune these settings with precision, in real-time.
2. Adjust color saturation
Color saturation in video refers to the intensity or richness of colors present in the footage. It affects the richness, vibrancy, and visual impact of the colors. Color saturation can be the key setting that enhances the quality of a video by highlighting your message or brand, taking attention away from something, or conveying a feeling.
Here are some best practices for when it’s time to edit the color saturation on your videos:
- Use color saturation to convey emotions. For example, you can use bright saturation to evoke joy and excitement. Conversely, in a melancholic scene, desaturate the colors slightly to evoke a sense of nostalgia or drama. Remember, subtlety is key to creating a compelling visual impact.
- Saturate (and desaturate) per scene, not the entire video. Each scene in your video may require different levels of color saturation to maintain a consistent visual tone. Pay attention to lighting conditions, the mood of the scene, and the overall aesthetics. By adjusting saturation per scene rather than treating your video as a whole, you can get a more cohesive look throughout your video.
- Experiment with color palettes. To better understand the impact that color saturation has on your videos, test different palettes on your color saturation slider. Try desaturating specific colors while maintaining the vibrancy of others to see how it alters the video’s mood and visual dynamics.
3. Reduce noise and grain
Noise — not to be confused with background noise — refers to random variations in brightness or color that create unwanted artifacts on your video, while grain is a fuzzy texture caused by film or sensor imperfections. When not addressed, noise and film grain can distract your viewers, reduce the sharpness of your footage, and reduce the overall professional look of your video.
To effectively reduce noise and grain and achieve visually appealing results, here are three best practices to follow:
- Use proper lighting and exposure when filming. Well-lit footage captured under optimal lighting conditions minimizes the noise and grain present in your video. Use diffused lighting sources and avoid underexposure or overexposure to capture clean and high-quality footage. Descript’s video editing platform offers features like brightness and exposure adjustments, allowing you to fine-tune the lighting and exposure levels to reduce noise and grain effectively.
- Reduce noise selectively. Instead of applying noise reduction uniformly across the entire video, consider selectively reducing noise in specific areas that are more prone to noise or grain, such as shadows or dark regions. Descript offers advanced noise reduction features that enable you to target and reduce noise in specific frequency ranges or areas, preserving more details and avoiding the over-smoothing effect that can compromise image quality.
- Quality denoising filters. Use high-quality denoising filters during post-production to effectively reduce noise and grain without sacrificing important visual details. Descript provides access to professional-grade denoising filters that employ advanced algorithms to intelligently analyze and suppress noise, ensuring optimal noise reduction while preserving the sharpness and clarity of your video.
4. Adjust blur and sharpness
Blur refers to reducing the clarity and sharpness of an image, while sharpness enhances fine details in the footage. Adjusting blur and sharpness allows you to guide the viewer’s attention to specific subjects or elements within the frame. A well-placed blur can draw focus to the central character in an interview, while sharpness can highlight intricate textures in product shots, elevating the overall visual impact.
- Play with the depth of field. Use selective blur to enhance the depth of field in shots, providing a cinematic look that separates subjects from the background and brings focus to the foreground (a.k.a. a Bokeh effect).
- Use depth staging. To create a sense of depth and dimensionality, apply blur to the background layers while keeping the foreground sharp. This technique is particularly useful in interviews or dialogue scenes, where the main subject stands out against a slightly softened backdrop, drawing the viewer’s attention to the conversation’s emotional content.
- Use blur to highlight text on your video. You can incorporate blurry video to draw attention to on-screen text, titles, or graphics. Gradually increase sharpness on these elements, ensuring they stand out clearly against the background and support the video’s messaging and branding.
Descript’s video editing tools include a blur tool and a zoom blur. You can apply both of these effects to a visual layer from the Properties Panel.
5. Optimize compression settings
Video compression refers to the process of reducing a video file’s size while preserving its visual integrity (no visible pixels) and audio integrity. During compression, redundant data is removed from the video file, resulting in reduced file size. However, if compression is set too high or the wrong settings are used, it can lead to a low-quality video really quickly: visible artifacts, blurriness, and a loss of detail will diminish the overall video quality.
Here are some ways you can compress your video without losing quality:
- Shorten the length of your video. Look for any parts of your video that you can remove. Start at the beginning and the end: what’s absolutely necessary to keep and what can you do without? This type of trimming is something you can easily do with any video editing tool, including Descript.
- Adjust the video resolution. One of the simplest ways to shrink your video’s file size is to reduce its resolution. Take a look at where the final video will live. If it’s YouTube, you can bring the higher resolution down to 1080 pixels. For social media, where the priority is the mobile view, it might be possible to bring it down to 720 pixels.
- Export your final video using MP4. While there are other video codecs for cinema-quality files, MP4 video files are the preset of choice for YouTube and other social videos. Descript’s all-in-one editing software includes video compression, so you don’t have to download additional apps like VLC.
Descript lets you choose bitrate conversion or frame rate reduction — all without losing video resolution.
Video editing enhancement FAQs
Here are some frequently asked questions about enhancing video quality, along with concise tips for sharpening your footage, reducing noise, and getting the most professional look possible.
What does it mean to enhance video quality?
Enhancing video quality refers to the process of improving various aspects of a video to enhance its visual appeal, clarity, and overall impact. This includes adjusting brightness, contrast, and color saturation, reducing noise, sharpening, and optimizing compression settings.
How can I enhance video quality without losing resolution?
To get higher quality without losing resolution, it’s important to start with the best possible source footage. By capturing high-quality video in the first place and using advanced editing tools, you can make adjustments without trading off resolution. Tools like Fotor’s AI video enhancer even let you unblur footage and boost clarity online, preserving your original size and proportions.
Can I enhance the quality of a low-resolution video?
While it may be challenging to significantly improve the quality of a low-resolution video, there are techniques and tools that can help. In Descript, you can reduce noise, adjust brightness and contrast, and color-correct your footage to make it look better overall. However, Descript does not upscale or increase your original video resolution. That means if your video was recorded at 1080p, exporting it at 4K doesn't generate any extra detail — it will still appear as 1080p quality. For best results, start with the highest resolution footage you can.
What are some techniques to enhance video quality?
Common techniques include:
- Adjusting brightness and contrast to make footage more vibrant without overexposure.
- Tweaking color saturation to highlight or soften colors.
- Reducing noise and grain to remove unwanted specks or visual imperfections.
- Sharpening the image to enhance edges and bring clarity to important details.
- Optimizing compression so you don’t lose quality when exporting your final video.
Are there free tools to enhance video quality?
Yes, there are free tools available that can help enhance video quality. One such tool is Descript, which offers a range of features for video editing and enhancement. While the free version may have some limitations, it provides accessible options to improve video quality.
Enhancing video quality doesn’t have to feel daunting or require a massive production budget. By using a few strategic techniques—plus a user-friendly editor like Descript—you can quickly create crisp, polished videos. When you’re ready to streamline your workflow and take your visuals to the next level, sign up for Descript and see how simple great editing can be.
How can I improve a blurry video?
You can make a blurry video look clearer in Descript by adjusting brightness, contrast, or color saturation, and by reducing noise or grain. These edits can help sharpen footage and enhance visible details. Keep in mind that these adjustments can’t fully restore detail that wasn’t in your original recording, so it’s best to capture video in the highest quality possible from the start.
.jpg)


